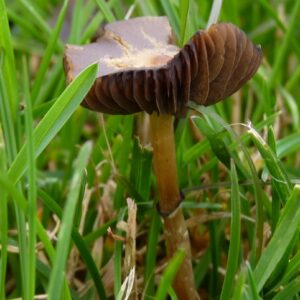
Psilocybe Cyanescens
$180.00 – $1,000.00
Description
Psilocybe Cyanescens For Sales Online. Buy Psilocybe Cyanescens Spores / Seeds / Syringes Online
Habitat and distribution Of Psilocybe Cyanescens
Psilocybe cyanescens grows today primarily on wood chips, especially in and along the perimeter of mulched plant beds in urban areas, but can also grow on other lignin-rich substrates. P. cyanescens does not grow on a substrate that is not lignin-rich. Fruitings have been reported in natural settings previously (although most appear to be migrations from mulched plant beds.) The species does not typically grow on mulch that is made from bark.
In the United States, P. cyanescens occurs mainly in the Pacific Northwest, south to the San Francisco Bay Area. It can also be found in areas such as Western Europe, Central Europe, New Zealand and parts of West Asia (Iran, Tehran). The range in which P. cyanescens occurs expands rapidly, especially in areas where it is not native as the use of mulch to control weeds has been popularized. This rapid expansion of range may be due in part to the simple expedient of P. cyanescens mycelium having colonized the distribution network of woodchip suppliers and thus being distributed on a large scale with commercial mulch.
Although it has been speculated that P. cyanescens’ native habitat is the coniferous woodlands of the north-western United States or coastal dunes in the PNW, the type specimen was described from mulch beds in Kew Gardens, and there is no widely accepted explanation of P. cyanescens original habitat.
Fruiting is dependent on a drop in temperature. In the San Francisco Bay Area, this means that fruiting typically occurs between late October and February, and fruiting in other areas happens in fall when temperatures are between 10-18 °C (50-65 °F).
P. cyanescens often fruits gregariously or in cespitose clusters, sometimes in significant numbers. 100,000 P. cyanescens fruits were once found growing on a racetrack in the south of England. Solitary fruits are sometimes also found.
Simple psilocybin mushroom growing technique
Materials and equipment
- Vermiculite
- Perlite
- Water
- Brown rice flour/rye flour
- Short wide jars
- Big bowl
- Spoon
- Tin foil
- Pressure cooker
- Spore prints
- Syringe
- 2 plastic toy tubs
- An aquarium heater
- 2 extra Spare jars
- Towel
- Colander
- 1 large tub with a lid
- Drill
- Spray bottle
The procedure Of growing Psilocybe Cyanescens And Other Mushrooms
Step 1 – STERILIZE EVERYTHING!
Before the BRF tek is started, sterilization procedures need to be taken. The surface working on should be as sterile as possible as well as the equipment and tools.
Windows should be kept open if possible, as this will help with the air staying sterile.
An antiseptic cleaning spray should be sprayed in the area that will be worked in every so often to ensure no dust or germs infect the jars. It’s vital that sterilization procedures are taken as it’s very easy for the jars to become contaminated.
Step 2 – MAKING THE CAKES
To know how much vermiculite, water, and brown rice flour is needed, a bit of math is required (but nothing too complicated).
The following ingredients are needed to fill a 240ml jar:
- 140ml Vermiculite.
- 40ml Brown rice flour.
- 20-30ml water.
To work out how much of these ingredients will be needed, it will depend on the number of jars and how much the jar can contain. For example, if we wanted to use six 240ml jars, each ingredient would need to be multiplied by 6.
Once the amount of each ingredient is figured out, the vermiculite and water need to be mixed until the water starts to pool when the bowl is tilted to the side.
Afterward, the brown rice flour is added. The mix then needs to be put into the jars, leaving about half an inch left at the top, and then filled with dry vermiculite.
2 Layers of foil need to be put on top of the jars tightly, so they won’t come off. Then put a 3rd layer of foil on very loosely.
The jars need to be sterilized further, so they need to be put in a pressure cooker for about 20-30 minutes. The lids of the jars can be put at the bottom of the pressure cooker to ensure that the jars at the bottom of the pressure cooker do not get too hot.

Spore syringe
Step 3 – INOCULATION
After the jars have cooled down, the jars then need to be inoculated with the spores. A syringe is used to do this, and it needs to be sterile.The spore print should be scraped off with a scalpel very lightly into a sterile jar or cup, and then 10ml of water should be added.
Using the syringe, the water, and spore mixture should be sucked into the syringe. If the spores stick to the bottom of the jar, empty and refill the syringe a few times. This also helps to ensure that the spores are properly mixed into the water.
The 3rd layer of foil on top of the jars should be taken off then pierce four sides of the 2nd layer of foil with the syringe. The number of spores put into the jar does not really matter too much, but more usually is better to ensure the jars do get inoculated. Once all the jars are inoculated, the 3rd layer of foil needs to be put back on the jars tightly.
Step 4 – INCUBATION!
One of the tubs should have an aquarium heater placed on the bottom of the tub and then filled 1/3 of the way up with water. The aquarium heater should be set to 27 degrees C. Then the second tub should be placed inside, using the spare jars to hold up the second tub, so that the aquarium heater is not touching the bottom of the top tub. The jars should be then placed inside the tub. If the jars need to be stacked, a piece of card should be used to separate them as the bottom of the jars should not be resting on top of the foil as this could make the foil become loose and then will be prone to contamination. A clean towel should then be placed on top of the box to keep in the heat.

Colonization of Psilocybe cyanescens.

A contaminated jar.
Step 5 – COLONIZATION
After 3-5 days, signs of colonization should appear. The jars should have little specks of a white growing inside of them; this is the mycelium that will eventually colonize the whole jar. If any other color other than white (and the brown vermiculite) is seen in the jars, it means that the jars have been contaminated and has mold growing on them. More sterile procedures need to be taken the next time this is done.
If the jars have started to colonize properly, then full colonization should take from 2 to 6 weeks. Depending on certain things, colonization can vary from just a couple of days to a month or two.
Things that will affect the speed of the colonization are:
- Temperature of the room
- Air humidity
- The strain of spore
- Patience is needed for this step, but if signs of colonization are shown, most likely the whole jar will eventually be colonized.
Step 6 – PINNING
When the jar has completely colonized, they should be taken out of the incubator and placed in direct sunlight at room temperature. Pins should start to be seen in the jars after 5 days, but sometimes pinning can occur during step 8. (Pinning is the name given to the mushrooms when they are first seen, as they are very, very small and thin.)
Step 7 – DUNK & ROLL
After 5 days are over, the cakes should be taken out of the jars and washed under a tap, to get any excess vermiculite off. The cakes should then be submerged (dunked) in a big pot of water for 24 hours. After the 24 hours, the cakes then need to be taken out of the water and rolled in dry vermiculite, helping to keep in the moisture. (Cakes are the name given to the mixture of vermiculite and mycelium once they have left the jars.)

Step 8 – FRUITING
A fruiting chamber is needed and is made by drilling multiple holes on all 4 sides of the tub and on the lid (this helps with the air flow in the tub). The perlite should be poured into a colander and soaked in water thoroughly. After the perlite has been soaked, it should be placed into the fruiting chamber (about 5-7 liters is needed, but depending on the size of the tub the level of perlite should be about 2-4 inches high).
The cakes should be then placed in the fruiting chamber on top of a small square piece of foil to ensure that the mycelium does not grow in the perlite, But I am not entirely sure if that is a bad thing or not (yet)… Then when the cakes are all placed inside, the tub should be sprayed with water AT LEAST three times a day.
If pinning didn’t occur during step 6, they should start to pin during this step, but again patience is needed as pinning can sometimes take a while.

Now they are fully grown and ready to pick.
Step 9 – PICKING
You should see progress within a week or two, possibly less than that. Picking them is usually best to do, just after the veil is broken (the veil is the thin piece that attaches the stem to the cap). If you see some pins on the cakes that have turned black, these are called aborts. They are still okay to eat. They just didn’t manage to grow quickly enough, but they’ll still have psilocybin in them 😉
Dosage, onset and duration
- Threshold: 0.25 g
- Light: 0.25 – 2.5 g
- Moderate: 2.5 – 5 g
- Strong: 5 + g Onset : 10 – 40 minutes
- Onset: 20 – 60 minutes (when swallowed on an empty stomach)
- Duration: 2 – 6 hours
- Normal after effects: up to 8 hours
Preparation Psilocybe Cyanescens And Other Mushrooms
The easiest method of preparation for eliminating nausea and taste is having the mushrooms prepared into a chocolate bar. This can be done by melting a small standard size chocolate bar. While the chocolate melts, the dried mushrooms need to be blended into a fine powder. The powdered mushrooms would then be mixed into the melted chocolate, and the mixture should then be left to set in a mold and placed into the fridge so that the chocolate can settle. Once the chocolate has settled, the tasty psychedelic treat can be consumed.
A quicker technique is putting blended mushroom powder into a chocolate spread or jam sandwich as this disguises the taste completely and reduces nausea in leaps and bounds.
Additional information
| Psilocybe Cyanescens | Oz, 1/4 Pound, 1/2 Pound, 1 Pound |
|---|
Related products
-
- Hallucinogens
Mescaline
- $150.00 – $750.00
- Select options This product has multiple variants. The options may be chosen on the product page
-
- Hallucinogens
Portabella Mushroom
- $150.00 – $850.00
- Select options This product has multiple variants. The options may be chosen on the product page
-
- Hallucinogens
Psilocybe Stuntzii
- $180.00 – $1,200.00
- Select options This product has multiple variants. The options may be chosen on the product page